For one of our own
MY OWN BUILD…
This blog is going to be unapologetically long. It’s about my own build, focusing on the design aspects and to give you a glimpse of the process involved with building.
I’ll try to keep you up to date with our new build all along the way, from design to move in and landscaping. If you have any questions please don’t hesitate to drop us a line at admin@4sitedesign.co.nz
_________________

The site
DESIGN PHASE - JUNE 2019
It’s a tough gig working at 4Site Design. Not only because it’s a bit of a ‘guy-zone’ but also because I’m surrounded by people building their dream homes. Beautiful homes. I love helping these people through the build process – for some of them it’s a dream coming to fruition and will be their one and only build. For others, each home is a stepping stone along their lifetime, changing as their families grow. I love seeing our clients build their dream homes however, in the back of my mind I’m always thinking about my build, and it’s been a long time coming.
I’ve been an admirer of the Palm spring mid-century modern style long before it came in vogue. I love NZ architecture from the 1960’s and would very happily embrace one of Ron Sangs homes if I should ever be so lucky. But they are as rare as hens’ teeth so we’re building new and referencing back to these styles to keep us on track.

Design inspiration images
I tried to keep my brief to Paul pretty open (he might beg to differ on this!). I gave him a few photos of the styles we liked and what were list of must haves, such as office nook in the living area, a rumpus/photography studio room and double garage with extra storage space. All this on a very average budget.
When looking through the photos there were a couple of things quickly apparent to Pauls’ designer eye – all the images I had supplied the windows went right to the ceiling, usually there is a space between top of the window and the ceiling when viewed from the inside. And also, importantly for a mid-century modern inspired build, a wall that flows right from the inside to the outside.

Initial design
Paul came back to us with a design that we loved. We worked with him to make a few small changes and reduced the footprint a little to avoid the need for a resource consent and to ensure we met the all important budget constraint. The finished design, that we love, includes those important to-the-ceiling windows, the wall that flows from exterior to interior and huge expanse of windows for maximum sunlight to bask in. The design is split level, with only two steps down to the lower level. The benefit of this is two-fold. It takes advantage of that slight slope in the land and avoids bringing in fill (yay, a win for the budget) and also adds height to the open plan kitchen/living/lounge area. This feeling of spaciousness without being in a really large home is something I’m pretty excited about.
On to the working drawings phase to submit to council for consent!
_________________
WORKING DRAWINGS PHASE - AUGUST 2019
This phase can be a confusing stage for our clients, the design seems pretty much done right? No not really. And now I’m experiencing that for myself.
In this stage the draftees are working through every little detail in our home, essentially they are building it, but on paper. It is these drawings that the builder uses to quote the job, and to submit to the council for consent.
There are a lot of questions and decisions to be made, for example, exactly where the inside/outside flow wall will start and stop. We’ve decided that wall will be brick, so running down the inside of the hall will be stacked painted bricks. This was a big decision as there were many options including timber, tiles, blocks and even rendering. The brick we’ve chosen is longer than the ‘standard’ brick at 290mm long (most are 230mm long) and it has a very textured finish - another nod to the mid century style.

An example of a wall flowing from the outside to inside - shown this 1953 home in vertical timber. Note also the bricks shown here are stacked. Photo from dwell.com
One of the hardest decisions to make is the heating. The options were ducted heating and A/C throughout, wood fire, gas fire or underfloor. Each has their own positive and negative points which make it difficult. We talked to homeowners who have each of the systems we considered and decided to go with hydronic underfloor heating which goes into the concrete slab when it is poured. It’s absolutely critical it is planned well, but the benefit is the heat will be evenly distributed throughout the house.
The engineers worked hard on the bracing elements of the home and the rib raft floor also had to be designed by an engineer as it was outside of the ‘standard’ with the step down in levels. The floor will be poured in two stages due to this.
There is a lot of hidden detail to be worked through as those windows that go right to the ceiling means there is no lintel above the windows. We’ve made broad range selections of bathroom fittings to make sure what we want fits, but we haven’t locked anything in - it just feels too early to get that detailed, although it would be fine to do now if we wanted to.
We have also decided the floor coverings for each area as this affects the rebates required in the slab for the ranchsliders. We are going to go with engineered wood in the kitchen (easier on the body than tiles), carpet in living and bedrooms and tiles through the hallway and bathrooms.
We get all the drawings completed, signed off by the engineer and in to council on my birthday. YAHOO, happy birthday to me.
Next stage: Consent, and floor down
_________________
CONSENT AND FLOOR DOWN - DECEMBER 2019
We received the consent for the house in December and poured the floor in the same week! A very exciting time for us all.
We had a contractor (AG Builders) do the site prep the rib raft set out all ready for the plumbing/underfloor heating guys (Atmosphere) to come in and do their pipework. The underfloor heating pipework plans are very detailed and photographs were taken so if we ever need to know where the pipes are under the slab we can locate them.

Ribraft setup ready to pour. The orange pipes are for the underfloor heating.

The AG team pouring the floor
Once the plumbers were finished the AG team were back at 5:30am to pour and finish. They did a great job under pressure with the pre-Christmas rush.
Now we all can relax over Christmas.
Next stage frames, trusses and rafters up.
_________________
FRAMES AND TRUSSES UP - JANUARY / FEBRUARY 2020
After the Christmas break our builders Ultrabuild Taranaki are on board and we are progressing really fast. It’s like a giant jigsaw puzzle as all the prenailed frames are delivered onsite and Gavin and his crew assemble in double quick time. Before we know it we can walk through the rooms and really get a feel for the spaces. It’s particularly great for the kids as for the first time they can really understand just how big their rooms are and what sort of layout they might like to have in their rooms.
When walking through we do a final check of the windows and I’ve made a couple of small tweaks on site - the builders are super helpful and made the adjustments for me. We do so much work on paper to get it all perfect but there is nothing like walking through and seeing exactly what view will be out each opening. Once the openings are all 100% we have Brownie from Outlook Aluminium along with Altherm Aluminium do their onsite measure. Windows are a huge feature of the design of this home, and there are some really critical parts that need some creative thinking and careful construction.
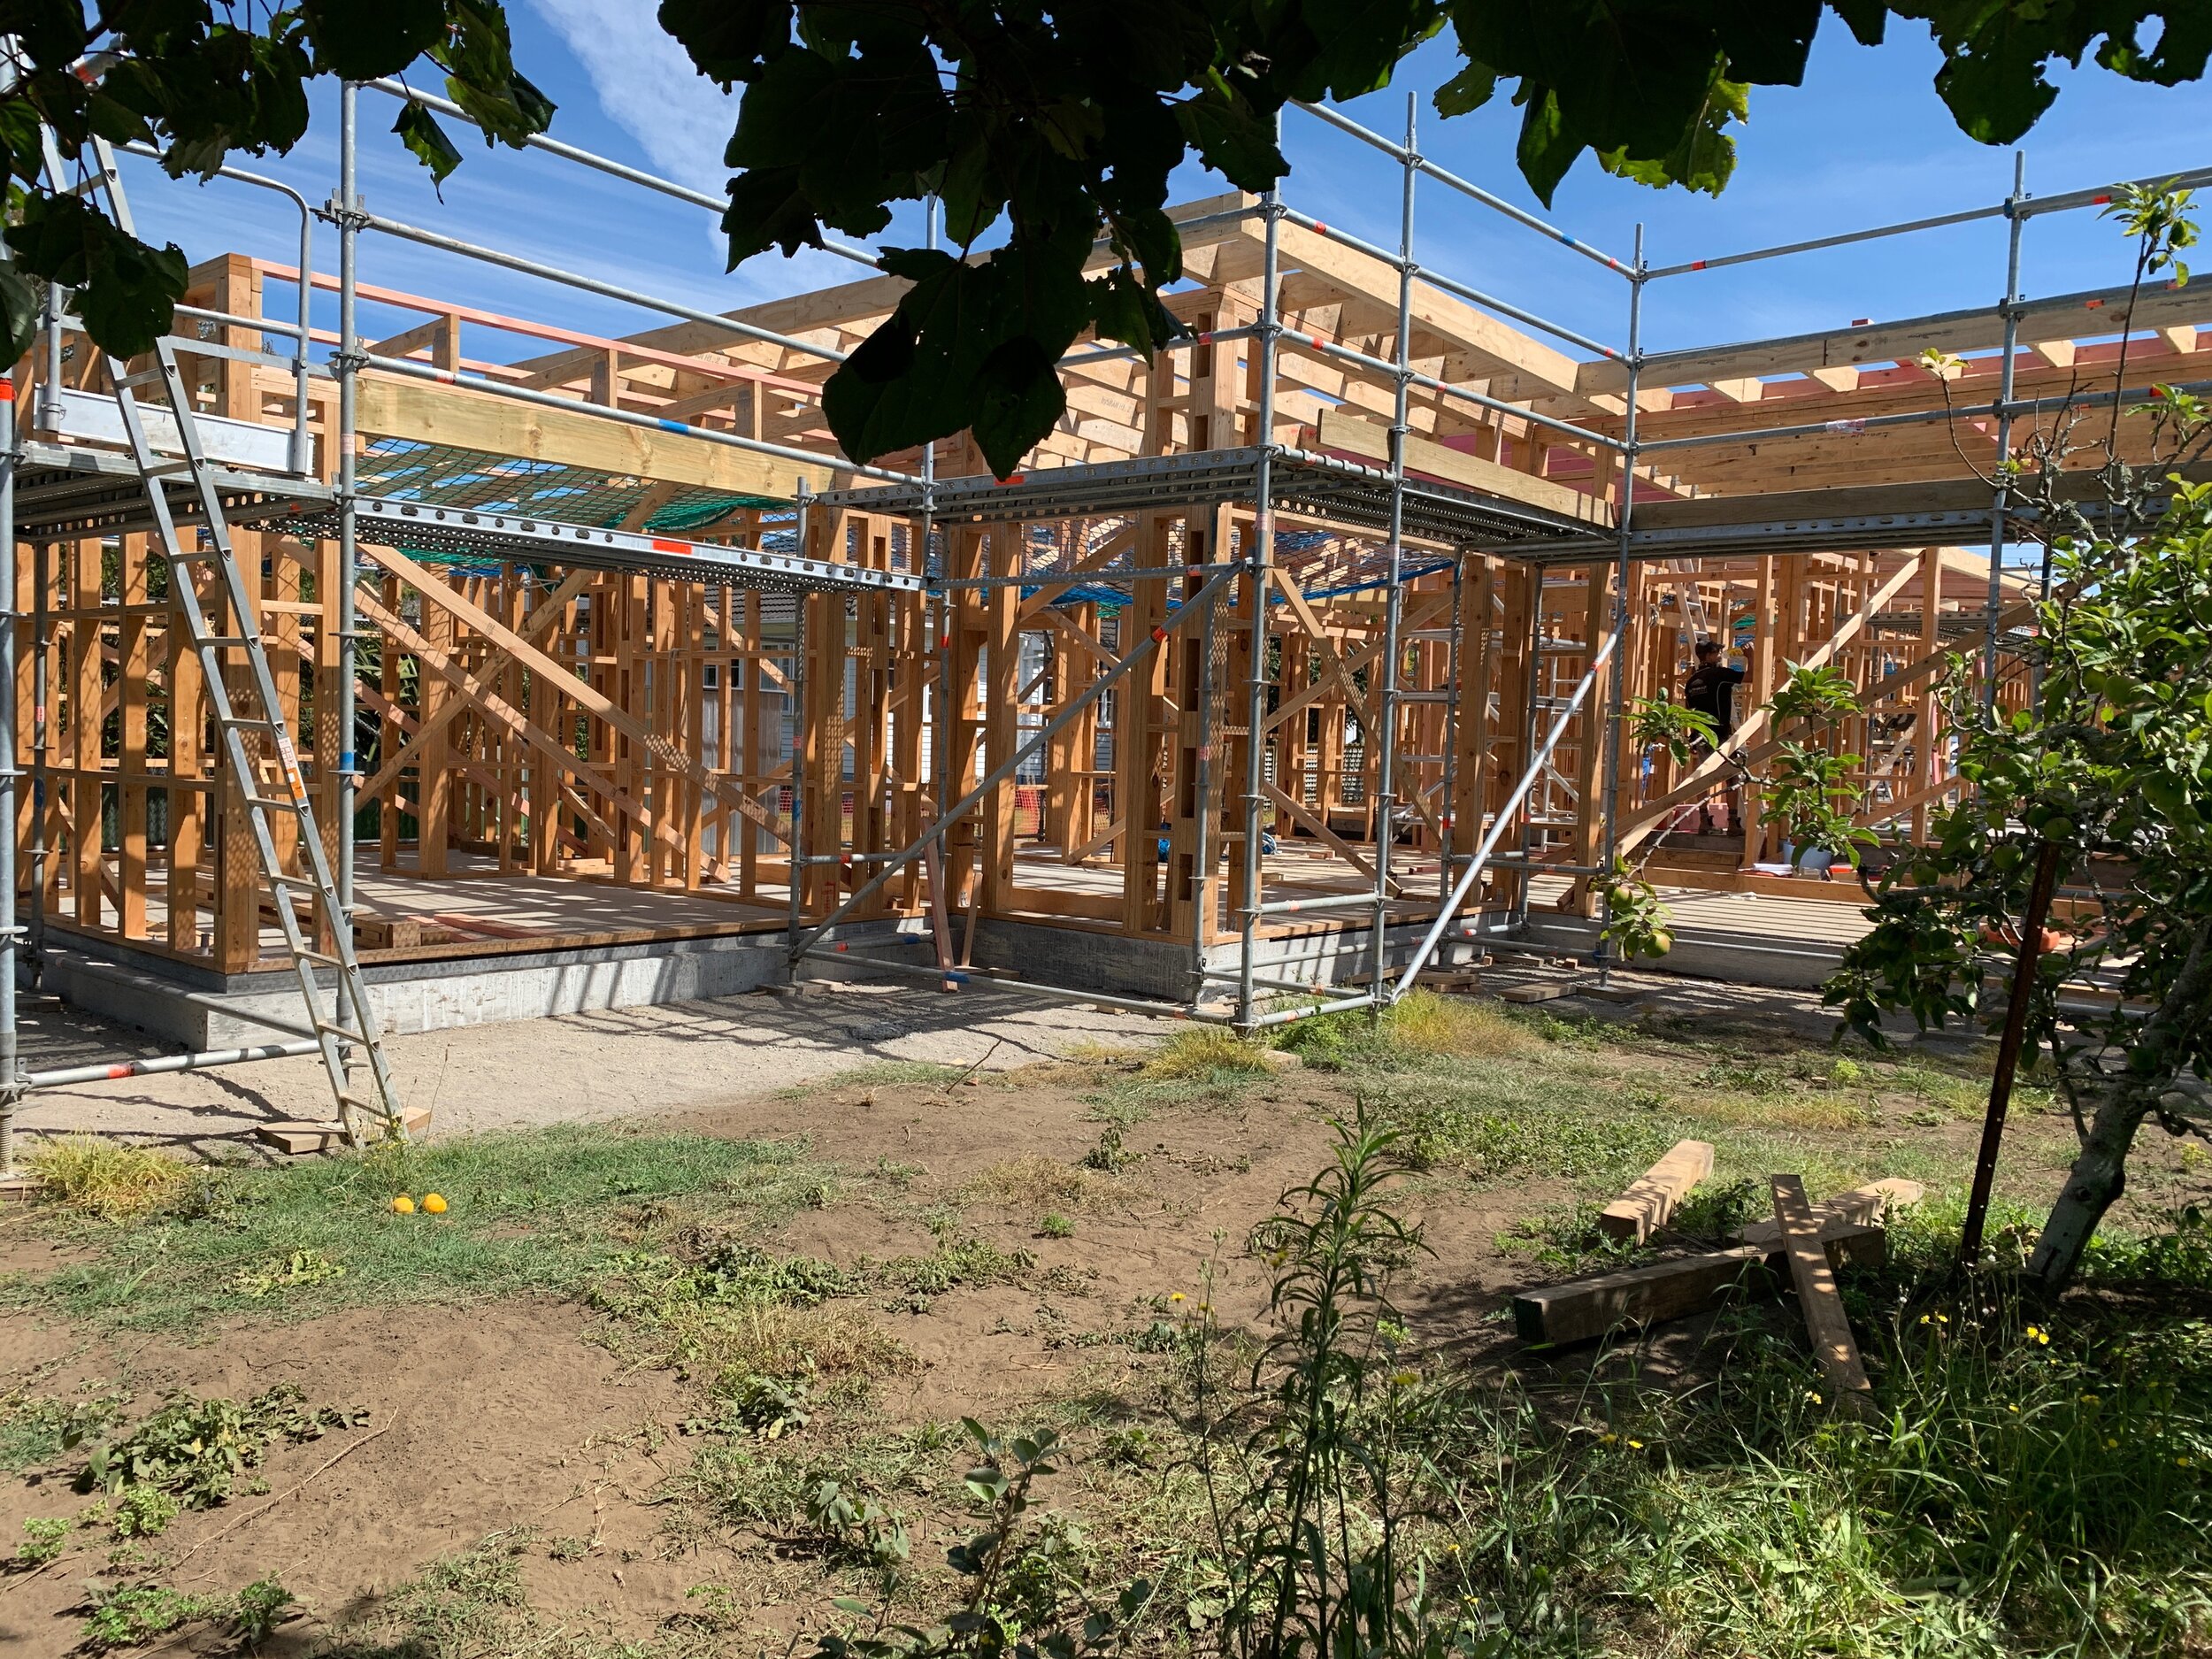
Framing, roof trusses and rafters up - exciting progress
In the background we’ve been working selecting vanities for the bathrooms and started really drilling into the finer details of the kitchen design. We want to go with a wood grain and black with negative detailing, and I’m working with Nobby Kitchens to find a cost effective but still the right colour material for the wood sections - so we are looking at Melamine solutions with a Corian benchtop. While we also have a generously sized dining table we also like to sit at the island for some meals and the Corian has a warm, soft feeling to it that I like.

We’ve also locked in the flooring for the kitchen/dining area - we’re going with a gorgeous warm wooden flooring plank. There are loads of different ones on the market, all with their own pros and cons. We’ve gone with forte flooring Moda Sorento as it has the shade of American oak that we’re after and it also has a really small bevel on the edge of each plank. The one we’ve chosen is called a ‘prime’ board - so not a rusticated style of board which is also very cool at the moment.
Drum roll please… there’s your first sneak peek of the painted bricks. I love them, they are rough and textured and although they are available in lots of colours and don’t need to be, we are going to paint them. It all goes back to that original mood board and the mid century modern styling.
Up next, roofing, cladding and brick laying
_________________
Windows, CLADDING, ROOFING AND STOP - MARCH 2020
March sees us going full pace, the coloursteel roof is on, cladding on the south side is up, and some windows are in. We’re flying along and the builders are smashing all timeline goals. And then we stop. Covid-19 hits, we’re all in lockdown and we have a building that is partially open to the elements.

Coloursteel roofing showing the celestial windows in the dining
The good news is that it is looking fab and those decisions earlier on what colour roof and and joinery is, although outside of the ‘norm’ is proving to be a great decision. To go white and stick with the mid-century modern them against the massive tide of black joinery/ cladding houses is a bold move but one I’m glad we had the confidence to do. Pauls advice to stick with the original vision rings true.

These massive doors in the hallway provide sunlight and warmth radiating through the whole house
It may be that we can’t build on site but that doesn’t stop the progress. During level 3 we finalise the kitchen colours with help from a zoom call and courier samples from Prime Panels and the bathroom vanity colours are locked in with Chesters after a virtual showroom tour with the ladies at Newtech.
I’ve been terribly indecisive on tiles as we have a lot of them, and the ones I really want are simply way out of the budget. It is a really tough decision as we have a lot of them - they run all the way through the hallway and will act as a heat sink to naturally warm the house in the winter. The team at Tile Warehouse have been really patient with me and they organise a contactless pickup for me of a selection of tiles within budget and hitting the design brief. I love them, particularly that pink one which will be herringbone in the ensuite. Can’t believe Mr B went for it - it’s going to be amazing!

_________________
Back on site - MAY 2020
We’re back, and everyone is raring to go with renewed vigour. The Ultrabuild Taranaki team have a few new rules they need to work with level 3 but they take it in their stride. Physical distancing rules mean they have to work a bit differently than normal and the number of trades onsite at once has to be carefully managed but as normal Gavin has it all under control and the site runs smoothly.

Stacked and painted bricks
The bricks are looking amazing, (thanks Peter Leech). The stacked bonded look was definitely worth the extra cost and thought that has gone into it. I must admit I saw their faces drop when I told them we were painting it - I’m sure they thought we were mad, but it ties it all in together, and that will be even more pronounced when we get the bricks up inside as well.

Aluminium joinery is in and the first coat of paint reveals the mid-century modern vibes
The last bit of the cladding is finished and the rest of the aluminium joinery has gone in. The windows and doors are massive and although there has been some head scratching moments with them going right to the ceiling, I’m sure they will all agree it’s worth it.
Up next: insulation, gib and feature ceiling.
_________________
FAST PACE - JUNE 2020
It’s been a month of massive changes. The insulation and gib have gone up - which of course means all the wiring has gone in. It’s been so important to spend the time with the electrician getting everything in the right places - so we have chosen most of the pendants and locked in where downlights / pendants will be placed. Decisions on where hotpoints will go (remembering table lamps and charging stations) have all been made so in this stage all the wiring is completed before the insulation goes in. Harrisons Solar is locked in and we’re looking foward to no/low power bills.
Decisions have been made on paint colours throughout the house and the painter is booked for next month.
The gib makes everything look so different. It’s great to really be able to see the light that will be available in every room and feel the high ceiling space in the lounge.
The brick work has been finished in the inside hallway and it’s amazing.

Gib up in the dining and lounge. Ceiling ready for the T&G to up on these areas
_________________
MID WINTER SWIM - JULY 2020
The Narellan pool has arrived! It looks amazing, and I’m so pleased with how it looks from the entrance/hallway. Our driveway is pretty tricky but the guys got it down there no worries and lifted it over the house. I know a lot of people need to put the pool in before building starts for access but we were lucky that we were able to lift it in very near to the end of the build. This means we didn’t need an extended period of time with it fenced and getting dirt from the site in it for months. The crazy kids have already been swimming in it - it’s freezing. Decision wise we did a lot of research on which pool to go for - they all have their pros and cons, but we went for Narellan as they had the right size for our spot and the service from Ross and his team was excellent.
Inside, it is really starting to feel like the home straight. Paint is on, the amazing T&G ceiling is up, and lights are installed. Most of the pendants are from Mr Ralph, and I love them.

The pool being lifted in. Check out the windows going right to the ceiling in the hallway behind.
_________________
POP THE BUBBLES, WE’RE IN! - AUGUST 2020
It’s truly the home straight now with the finishing off to the point where we can move in.
The decision to go with a tongue and groove ceiling in the lounge/kitchen/dining area was a bit of a tough one. It was always in the wings, but it is a good chunk of budget too. Paul encouraged us to take the leap and I’m really pleased we did - it’s that final mid century nod it needed and really emphasises the lovely height in the area. One of the very first scribbles of brief I gave Paul was “pool near the house so the reflections show on the ceiling”. Random, I know. I never thought this would be possible - well it is, and it’s magic.
The gorgeous grey loop pile carpet by Harrisons Carpet is made from man-made fibres, again a tough decision as I love wool, but as our house is so sunny this carpet is a great choice as it won’t fade like wool is prone to. It compliments the wooden flooring through the kitchen and dining area perfectly, and I love it next to the Tile Warehouse Terrazzo tiles. These tiles run the entire length of the hallway and flow seamlessly into the bathroom. It’s tempting to go ‘safe’ with tiles - step into any tile shop and you’ll see a line of of various shades of grey. But don’t. I’m surprised that our tiles and hallway are one of my favourite parts of the house - who would have thought.
Our kitchen is in and I love it. I guess I have to say that as I designed it, but Nobby Kitchens did absolutely amazing job on the quality and attention to the detail that it needed. Of course design wise it’s mid century modern, but that attention to detail is so important for the end result to sing.
Final accolades to the builder. Gavin and his Ultrabuild team were stars to work with on site the entire build and juggled the time constraints / covid / crazy lady with ease. The relationship between designer and builder is an often overlooked area, and this build highlights the result of awesome teams working together for fantastic results.
I wanted this blog to be a kind of insight to the decisions and process for building so I hope this has helped you. It’s a constant push/pull of wants/needs vs budget, and in these times, availability. It’s vital to have a great team around you, that understand the level you want to operate at.
I have loved having the opportunity to use my skills on a build of my own, and am super happy with the result. Thank you team, you rock!

Kitchen looking through to the lounge and pool. Note the all-important inside bricks and the tongue and groove ceiling. Lighting from Mr Ralph.

It’s all in the detail.

You can see the tiles running down the hallway here to the gorgeous blue front door

The pool runs alongside the hallway. The louvre windows are perfect for this location. The tiles in the hallway heat up during the day and release the heat during the night.

Ensuite - pink herringbone laid tiles

Main bathroom - these are the floor tiles which run seamlessly into the length of the hallway

Hallway looking towards the kitchen

The spot in summer

Lots of landscaping still to come, but it’s looking amazing.

The wall that flows inside to outside
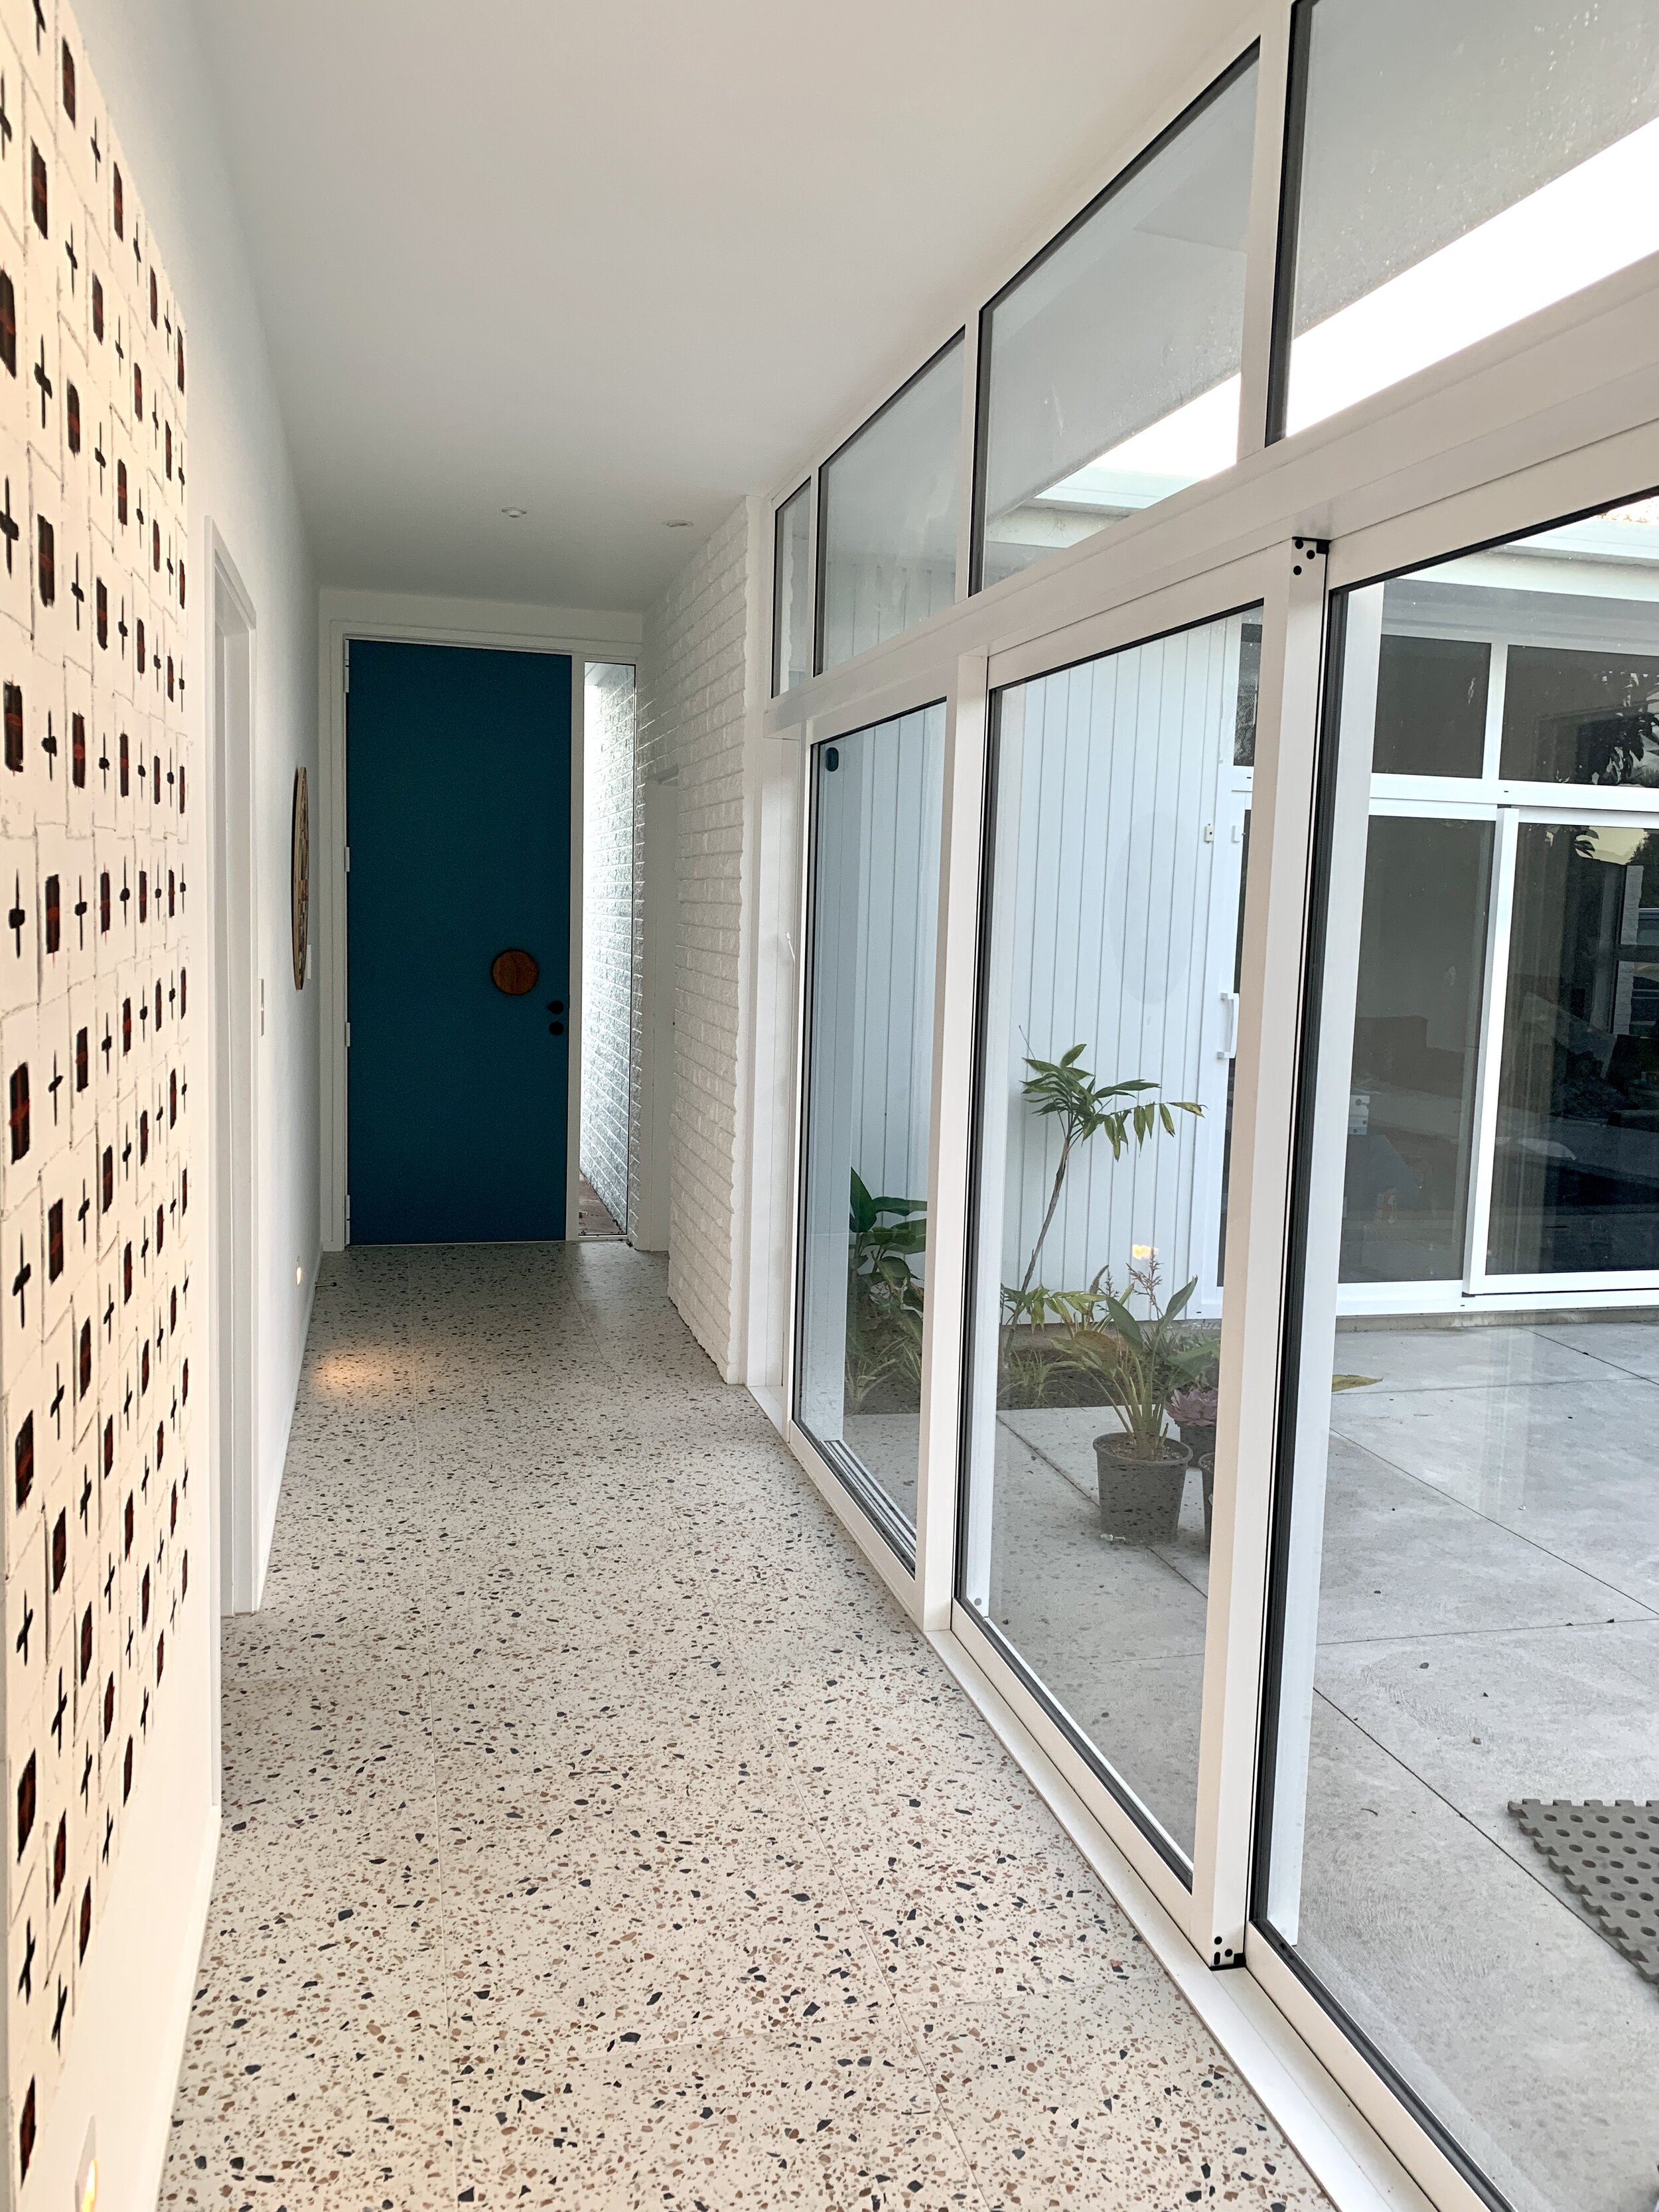
Hallway, entranceway and THAT wall
I’m always happy to talk houses. If you would like to ask any questions, bounce ideas, or engage us for your design, drop us an email at admin@4sitedesign.co.nz